Floating Table
After completing the previous exercise of crating a height using forces with the operation of stacking this was the next step in it by balancing out these forces and having a stable structure. Our Faculties asked to use skew sticks, thread, wooden base of 30cm x 30cm, i-screws and paper with length and breadth in ration of 1:2 and to create a stable model in which the paper is floating parallelly to the wooden base at a height using theses materials.
Initial ideations


Next, we were asked to build a 1:1 scale model based on the same design brief. We chose to build a seating table that relies on simple forces to stay upright. This idea was a key part of the project from the outset, and we were able to apply it in a real-world setting with our life-size model.

Design
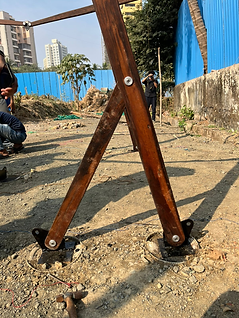
To build the life-size model, our class was divided into smaller groups, each focusing on a specific aspect of the project: foundation, lineout, wood, metal, table, and roofing. I was part of the wood team, but we didn't work in isolation. Instead, every student contributed to multiple tasks across different areas, ensuring that the entire structure came together seamlessly.
We began by preparing the site, located in front of our college, by clearing the area and leveling the ground to create a flat surface. Next, the lineout team marked out the basic outline of the foundation and perimeter of the structure. The foundation team then dug holes for the foundation buckets and steel reinforcements, and filled them with cement to create a level base.


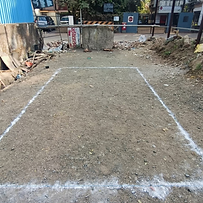


To get a better sense of the structure's scale and to ensure our pieces were accurate, we drew the elevation of the structure on the floor. This allowed us to double-check our work and make any necessary adjustments. By doing so, we were able to visualize the actual human scale of our structure, which was particularly important since this was our first time building a life-size model. This step helped us confirm that our pieces were correct and made any necessary changes before moving forward.
We prepared the wood members by first collecting the wood from the Vasai workshop and bringing it to our college.
The wood was then sanded to create a flat surface, and a master template was created with precise measurements. This template was used to cut out the remaining pieces, which were all made using the same process. The pieces were cut and sanded, and any cracks or gaps that formed were filled with sawdust and adhesive, or wax for minor gaps. The pieces were then sanded again and finished with linseed oil to protect the wood and enhance its appearance.


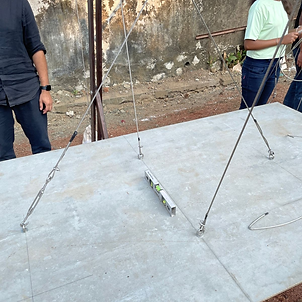


The table was later showcased at the IDAC exhibition, Mumbai.

